Ross

Colour Changing Crystal Light

by Ross
Colour Changing Crystal Light

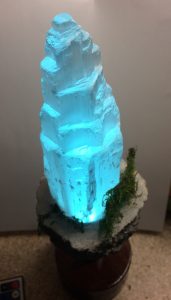
This is my take on the colour changing crystal island shown by DIY Perks at this link https://www.youtube.com/watch?v=Jh618yi0JZY.

I was in need for a birthday present for a friend so I decided to adapt the excellent design that DIY Perks came up with. Firstly I decided to make it free standing to remove the need to put fixings into the wall. I got 2m of 22mm diameter pipe and then cut off 20cm to make the central support for the floating island. I made this the same way as shown in DIY Perks video by making a foil mould but instead of bolts, I used a cardboard tube that was just slightly larger than the copper pipe. Once the island was set, I removed it from the mould and test fitted the copper pipe which was held in place temporarily with blu-tack.

I then moved on to create the wooden base by glueing 2 pieces of 10cm x 10cm x 2 cm pieces of mahogany to each other. This was then cut into a circle with a large circular drill and then sanded down to remove sharp edges. Finally, a 22mm hole was drilled in the centre for the copper pipe to fit into and a 4mm hole was drilled from the outside for the power cord.

I then assembled the base and the concrete island, using grip fill to connect the island and the pipe and epoxy between the base and the pipe.

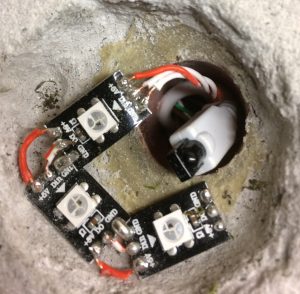
As for the electronics, I used 3 WS2812B individually addressable LED with a 44 key IR Remote with an accompanying receiver. For the first prototype, I used an Arduino nano on a breadboard due to the ease of use. However, in the final design, I used an Arduino Pro Mini due to its lower cost and the fact that it should only be necessary to program it once. The code is open-source and is available from GitHub at this link: https://github.com/W-R-A/IslandControl.

The LED’s and IR receiver sit just below the selenite tower, as shown in the picture below.
The schematic for the electronics can be found at this link: https://easyeda.com/Ross-Andrewartha/Colour_Changing_Crystal_Light-fc1098e4bcf741e8b0647f19d678b906.

With all the electronics functioning correctly and hidden inside the tube, I applied a coat of varnish to the wood and the pipe and with that the project was complete.
 

Using WordPress with GitHub Pages

WordPress is an incredibly popular CMS – Content Management System which allows websites to be created quickly and easily while being easy to maintain and expand. WordPress powers over 25% of all the websites on the internet. One downside of WordPress being a dynamic CMS is that scripts have to be run on the computer hosting the website, slowing down response times and requiring more resources than are required to host a static website. In addition, any security problems with the scripts that are run on the host computer can cause major problems such as causing the website(s) hosted on it to be lost or potentially causing the host computer to perform nefarious activities.

In order to prevent this, GitHub pages require that all sites that it serves are static, meaning that they do not use server scripts like WordPress. The official recommended option is to use Jekyll which generates a static site from the markdown provided and a template. While this is a fair option for generating static sites, I still prefer to use WordPress to design my site. So, to get around the fact that scripts cannot run on GitHub pages, I need to convert my dynamically generated web site to a static one. To do this I use the plugin Simply Static which produces a static version of the website that WordPress produces. This can then be uploaded to GitHub pages to get the best of both worlds, an easy to use, popular CMS, with the security, speed and cost benefits of using GitHub pages. It is free for some sites, see here for further details!

When I first uploaded my site to GitHub pages, I had some issues with some aspects of the page not loading and not being formatted correctly. Upon further inspection, I found that the Cascading Style Sheets were not being loaded and that trying to request them manually returned a 404 error. I found the problem to be that GitHub pages does not support underscores, (_) in the URL of any resources hosted on GitHub pages. As the theme that I am using, Cannyon uses a directory named frontend to store all the CSS in, it was this name that was causing the issues with the 404 errors.

To fix the problem I created a simple Python script to remove the _ from all the pages exported by Simply Static. I have included it below.

So, Hopefully, this post has shown you that you can have the best of both worlds with a quick and easy website designer combined with free yet fast and secure hosting.

Technology used on this website

by Ross

An overview of the technology behind this website and how everything fits together.

A quick note to say that this is not the best or only way to run a website/email but this post is about how I reduce costs as much as possible by combining free services.

In order to setup a website with email at that domain, several services must work together, in order of how I set them up for andrewarthacornwall.com, here they are:

  1. Domain
  2. DNS
  3. Email
  4. Hosting

1) Domain

The first thing that has to be acquired is a domain name for your website. There are a few options here, with free .tk domains available if you really want to save money, however, SEO ranking may suffer as google penalises sites with the .tk top-level domain. In addition, Zoho, the domain-based email provider, do not support .tk domains. With this site, I went for a .com address due to the fact that it is widely recognised and supported by major service providers. This is currently the only part of my web presence that I actually pay money for. To purchase a name you will need to go to a domain registrar. I use GoDaddy due to the competitive prices and good customer support as well as the fact that they offer domain privacy which protects your personal information from being shown on the whois database.

2) DNS

The second thing to setup is DNS or Domain Name Service, it is like a phone book that translates web address such as andrewarthacornwall.com into the IP address of the server hosting the content, such as 31.170.162.44 (Note: This is not the actual IP address of this server). With my site, I use CloudFlare to provide the DNS service due to the reliable anycast network and fast propagating of record updates. In addition, CloudFlare also provides a free CDN or content delivery network which speeds up the website and ensures that it loads quickly, wherever you are.

3) Email

The thing in common of all nearly all web services providers is that they require an email account of some sort. As I have the domain name, it seems appropriate to have a custom email address at this domain. This also looks more professional to anyone who needs to contact you and is also very easy to setup with Zoho mail.

4) Hosting

This is where your website is hosted from, there are so many hosting services available, with or without a cost involved and with a variety of applications to get your website up and running smoothly. I would always recommend paid hosting from an established company if you are not comfortable with managing your own server. However, if you are comfortable with running your own server, savings can be made. The method that I use is to have a local server, LAMP stack, running on my computer. This allows me to run WordPress, the most popular content management system, that is used to create a website. Once I have finished editing/building in WordPress, I use the Simply Static plugin, https://en-gb.wordpress.org/plugins/simply-static/ which creates a copy of the completed site. This can then be uploaded to GitHub pages which will then host the static content for free.